This is part 3 of 3 in a series. This series is actually for an English class assignment, but I decided to put it on my main blog instead of my second blog (http://antani02.blogspot.com/).
==DISCLAIMER==
Use these methods at your own risk. If your workplace has an Acceptable Use Policy that forbids employees from bypassing the filter, then think before making the decision to do so.
In my previous post, I explained how to set up an SSH server on a DD-WRT router. I will now explain how to connect to that server, and bypass filters with it. I will explain methods for Windows and Ubuntu. Here it is:
Windows
1. Download PuTTY (Here)
2. Open PuTTY, and use these screenshots for the configuration settings:
Session window:
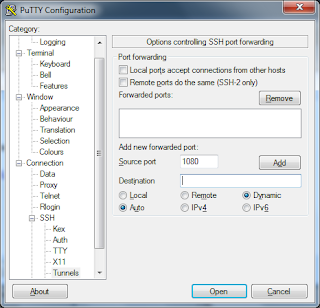
Then go to SSH -> Tunnels
In that image, type 1080 in the box, and then click “add”
3. Go back to “Session”, and in the box under “saved sessions”, type anything and click “save”. Now, any time you want to use it, you can open putty, click on your saved session, and load it.
4. Now, click Open at the bottom of the window. For the username, it will always be “root”. For the password, it will be your router password.
5. There are a few different browsers out there, so you will have to find out how to add a SOCKS proxy for your browser. I will say this general information:
- For the SOCKS proxy version (If it asks), it is SOCKS 5.
- For the SOCKS proxy server, use localhost
- For the port, use 1080
When you are done with the proxy, you will need to disable it in your browser.
For Ubuntu, it is the same thing, except you run a command instead of using PuTTY. In Ubuntu, just run this command, and enable the proxy server in your browser:
sudo ssh -D 1080 root@[your server here]Now, enter your username (root), and your password.
That concludes this guide on bypassing internet filters. I hope you gained something from this guide. I know that almost nobody actually reads this blog, but if you do, then I would appreciate some feedback on how I did with this Howto, and some improvements I could make, if any.


