Category Archive: Tech Tips

Fix for Skype disconnecting on Android

I recently had a problem with Skype on my HTC Evo 4G phone running Android 2.3.5. The problem was that Skype would keep disconnecting and getting choppy when the screen turned off.

Whenever I do something that causes the screen to turn off during a call, that includes putting the phone up to my ear to speak, the call would become very choppy and it would eventually disconnect from Skype completely. I have found a fix for this, and I’d like to share it with you so I can help others that may be having the same problem.

This post is the written version of my video tutorial, which you can watch below. The fix in the video is the same as it is here, but the video walks you through it in video form and also demonstrates the problem before and after fixing.


So, I will explain the process of this fix, and post images that will walk you through it. It’s really a very easy fix.

Before we jump into how to fix it, you need to know that the option used in this fix is not available on all ROMs. On the stock ROM for the HTC Evo 4G, I don’t think I saw this option. To find ROMs for your phone, go to http://forum.xda-developers.com/


Also the fix isn’t perfect. Yes, even after the fix, it may still be choppy for a few seconds on turning the screen off. But after that initial choppiness the call is smooth and sounds good, and most importantly it won’t disconnect. (Unless your Internet connection is bad)

So now, onto the fix!

This fix is actually ridiculously easy to do. Most of the video tutorial was just demonstrating the problem, and then the result of the fix.

First, open your settings menu. You can do this by pressing the “menu” button alongside your home, search and back buttons. Or, you can go into your applications and look for Settings.

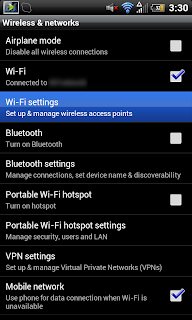
Second, go to “Wireless and networks”. This is accessed from inside the settings menu.
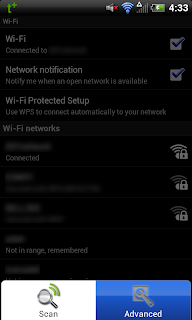
Third, go to “Wi-Fi Settings”.
Next, go to “Advanced”. To do this, press the “menu” button on your phone. In my experience I’ve seen this option on every ROM I’ve used, but it might be missing from your phone. Just a warning.


Next, check the box that says “Best Wifi Performance”. This part is critical, and unfortunately the option may not be available on all phones/ROMs.


Now, if you make a call with Skype and the screen is turned off during the call either by the sleep button or holding the phone up to your ear, the call won’t be dropped.

If a menu option shown here was missing on your device:

I’ve only ever used one Android device, and that’s my HTC Evo 4G. I can’t say anything for sure about other devices, but I know that at least on mine, the solution is to try another ROM. Other devices may not have this option at all on any ROM, other devices might not even have this problem to begin with. But, the only advice I can give you is to try another ROM. I can’t help you any more than that as far as missing menu options goes.

To find ROMs for your device, go to the XDA forums here: http://forum.xda-developers.com/

My ROM is called Energy, you can find it here: http://bit.ly/wmkS9c


Thanks for reading, I hope this helped you. Please comment if you have a question, suggestion, or comment on my post!

The Annoying “Keyboard Changing to French” Problem

Yes, it’s been a long time since I made my last post. A few months, in fact. Today I discovered something interesting about a minor but very annoying problem that occurs while typing.

Have you ever been typing a document and all of a sudden, when you press the question mark key you get a É character? Well, I`ve had that problem a lot and its been very annoying, but I finally found the cause. It is caused by the key combination CTRL+SHIFT (Control shift). I`m not sure why, but that`s a key combination that people (including myself) often hit by accident.

The CTRL-SHIFT key combination changes the keyboard language. This probably doesn`t occur much unless you purchased your computer in Canada (It might though, I`m not sure), but usually the next language [I just did it again by accident while typing this post, right here] “In line” is Canadian Multilingual or Canadian French (Depending on where you purchased it, this may vary).

So, the solution is just to press that key combination again until you get back to the right language. The first time you do it, take note of how many times you need to press it and you can do it faster next time.

I hope you enjoyed reading and I hope this has been helpful. More blog posts soon! :)

Minecraft: How to change your existing world’s random seed

Sometimes you may want to change the random seed of an existing level in Minecraft. Sometimes (Like in my case), the file somehow gets corrupted and the seed is ‘forgotten’ by Minecraft, or maybe you just want to generate new chunks with a new seed.

Changing the world seed is surprisingly easy. Here’s a short step-by-step guide on how to do it:

WARNING: This may erase your inventory on singleplayer. It is recommended that you put your inventory into a chest before doing this.

Long version:

1. Create a new world in Minecraft with the seed you want. Name it whatever (In this guide, it is called “NewWorld”. (You’ll see where I’m going with this.)

2. Once the world is created, save it and close minecraft.

3. Press Windows key + R (Or go to Start->Run), type in %APPDATA% and press Enter. (If you’re on Linux or Mac just find the .minecraft folder and skip to step 5)

4. Go to the .minecraft folder in the window that pops up.

5. Now, go to the “saves” folder. In this folder, go to the NewWorld folder (Or whatever you named the world).

6. Select level.dat and press Ctrl-C

7. Go back to the saves folder. Assuming you want to change the seed of “OtherWorld”, go to the “OtherWorld” folder.

8. Overwrite the level.dat in the folder with the one you just copied.

9. “OtherWorld” will now have the seed that you used for “NewWorld”

Short version:


Make a new world with the seed you want, copy the level.dat from that world to your other world (The one you want to change the seed of). The other world will now use the seed you used for the new world.


I hope this helps someone. I needed to do this for my server today, and it worked well for me.

Free iPhone/iPod Touch Transcoding Server

I have an iPod Touch 3G (32-gig) that I got for my birthday. I have some videos on my PC that aren’t converted for it or synced simply because I don’t need them often enough for syncing them to be worthwhile.
However, there is a solution that works on the iPhone, iPod Touch, and iPad that allows you to watch many different types of videos (wmv, etc.) with on-the-fly transcoding.

I tried TVersity, but you need to pay for it if you want support for iPhones.

I found a free program called Air Video that allows me to watch these incompatible videos on my iPod, streamed over the network. This program works for both Windows and Mac, which is great. What this program does is it converts the videos on-the-fly while it is streaming them to you. You don’t have to wait for videos to convert completely before watching them, you can actually start watching them almost instantly.

Copyright (c) 2009 InMethod s.r.o.


Air Video will work over a WiFi network, and can also stream through the Internet.

You will also need an app on your device to receive the videos. There are two versions of this app, a free version (FREE – Linky) and a paid version ($2.99 – Linky). They are almost the same, except that the free version will just limit the number of items in each folder. Note that the PC version is free, and has no limitations.

Here is a basic explanation of how to set it up (If you have any questions, just leave a comment):

1. Install Air Video on the PC

2. Open the program, and add the folders/playlists that you want to add.

3. Install Air Video on your device.

4. Open the app, tap the + icon in the top left corner

5. Under “Computers on local network”, you should see your PC, tap on it to add it.

6. You can now browse through its folders and watch your videos.

There is more information on the Air Video website, at the link above. That wraps it up for this post, thanks for reading!

The Canadian iTunes Store Now Accepts Gift Cards!

Today, I logged on to the App Store to check out the apps. Because Apple didn’t let Canadian iTunes gift cards be used on the App store, I decided that if Apple was going to be stupid, then I would just get free apps with Installous. Therefore, I usually go onto the App Store just to see some good apps that I could find cracked versions of.

Well, Apple has finally made the right decision, so they have my support again! I clicked “Buy” on an app (Doodle Jump), expecting it to give me an error about needing billing information, but to my surprise, it let me have the app, taking money from my gift card credit!

I am very happy about this. So, if you have a Canadian iTunes Gift Card, you can use it on the App Store now!

Point and Shoot Cameras – The Hidden Potential

I have a Nikon Coolpix L20 digital camera. It is a compact, simple 10MP camera. This camera costs around $89 on Amazon. It is a good camera that can takes very high quality photos, at least by my standards. This camera’s problem is the software.

My camera has almost no manual controls, apart from the flash, image quality etc. (Basic controls). It seems unable to focus and take clear photos in all but very well-lit conditions. In many lighting conditions, the photos will be blurry or grainy. This could possibly be solved by changing the ISO speed or the aperture size. Unfortunately, the only way to make the camera capture the photo faster is to turn on the flash, which has a good chance of screwing up the photo.

Notice in the picture below, it is extremely grainy when zoomed in. However, I took a picture of a piece of paper in the sun with the same camera (I don’t have the photo anymore, it was deleted), I could zoom in and see all the letters in perfect clarity.


Another problem I have noticed is the focus at close range. I don’t understand why, but when I try to take a photo very close up the camera will focus perfectly for a split second, and then the focus icon will turn red and indicate that it cannot focus. I have been told that manual focus will not solve this, but I am not sure that is true. I think that if I could change the focus manually, I could hold the focus at that ‘perfect’ spot, and take a very clear photo at close range.

The only kind of cameras that seem to have these controls are the advanced compact cameras ($250+) or the DSLR cameras ($500+). I find that very unfortunate, because as far as I know Nikon can add manual controls with a software update. A good software could turn this basic camera into a great camera with lots of advanced controls that can make the photos look much better.

Some people that I have talked to about this say that people want the camera to be simple, and therefore the camera is designed to be able to take photos without changing any settings. This can be solved by incorporating something like “Easy mode” and “Advanced mode”. Easy mode would have the very basic functions, and Advanced mode would hold many advanced controls for those who know how to use them. This compromise will make everyone happy, the ones who want it simple, and the ones who want better controls.

If they modified the software on these cameras to have advanced controls, they would be selling an $89 camera that has the features of a $300 camera. Would people still buy it? I certainly would. I would love to have an inexpensive camera that allowed me to set the ISO speed and the focus, instead of the camera doing it for me and getting it wrong.

The camera is capable hardware-wise of taking great photos, but is held back by the software.

This post is getting a bit long, and I am starting to ramble on about this. And though I am quite sure nobody really reads this, if someone does, please tell me your opinion on this.

HOWTO: Use DD-WRT To Bypass Filters – Part 3-2: SSH – The client

This is part 3 of 3 in a series. This series is actually for an English class assignment, but I decided to put it on my main blog instead of my second blog (http://antani02.blogspot.com/).

==DISCLAIMER==

Use these methods at your own risk. If your workplace has an Acceptable Use Policy that forbids employees from bypassing the filter, then think before making the decision to do so.


In my previous post, I explained how to set up an SSH server on a DD-WRT router. I will now explain how to connect to that server, and bypass filters with it. I will explain methods for Windows and Ubuntu. Here it is:

Windows


1. Download PuTTY (Here)

2. Open PuTTY, and use these screenshots for the configuration settings:
Session window:

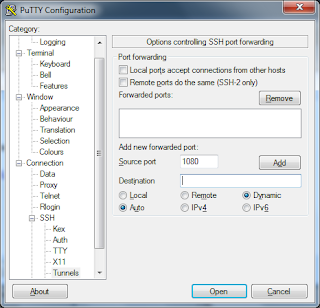
Then go to SSH -> Tunnels

In that image, type 1080 in the box, and then click “add”

3. Go back to “Session”, and in the box under “saved sessions”, type anything and click “save”. Now, any time you want to use it, you can open putty, click on your saved session, and load it.

4. Now, click Open at the bottom of the window. For the username, it will always be “root”. For the password, it will be your router password.

5. There are a few different browsers out there, so you will have to find out how to add a SOCKS proxy for your browser. I will say this general information:

- For the SOCKS proxy version (If it asks), it is SOCKS 5.
- For the SOCKS proxy server, use localhost
- For the port, use 1080

When you are done with the proxy, you will need to disable it in your browser.

For Ubuntu, it is the same thing, except you run a command instead of using PuTTY. In Ubuntu, just run this command, and enable the proxy server in your browser:

sudo ssh -D 1080 root@[your server here]

Now, enter your username (root), and your password.

That concludes this guide on bypassing internet filters. I hope you gained something from this guide. I know that almost nobody actually reads this blog, but if you do, then I would appreciate some feedback on how I did with this Howto, and some improvements I could make, if any.

HOWTO: Use DD-WRT To Bypass Filters – Part 3-1: SSH – The server

This is part 3 of 3 in a series. This series is actually for an English class assignment, but I decided to put it on my main blog instead of my second blog (http://antani02.blogspot.com/).

==DISCLAIMER==

Use these methods at your own risk. If your workplace has an Acceptable Use Policy that forbids employees from bypassing the filter, then think before making the decision to do so.


Previously, I explained how to use VPN to bypass a filter. I like that method a lot, but SSH has advantages. The SSH port 22 is usually open on firewalls, whereas VPN is less likely to be an open port. Also, it is a little simpler to set up.

So, here is how to set it up (Click images to enlarge):

1. Go to the router configuration page (Usually at 192.168.1.1)

1. Go to Services (You may have to enter your username and password)


2. Scroll down to where it says “Secure Shell”


3. Look in the image above, and use those exact settings under ‘Secure Shell’

And that’s it! The server configuration is done. Next post, I will explain how to connect to it and use it.

HOWTO: Use DD-WRT To Bypass Filters – Part 2-2: VPN – The client

This is part 2 of 3 in a series. This series is actually for an English class assignment, but I decided to put it on my main blog instead of my second blog (http://antani02.blogspot.com/).

==DISCLAIMER==

Use these methods at your own risk. If your workplace has an Acceptable Use Policy that forbids employees from bypassing the filter, then think before making the decision to do so.


See part 2-1 of this series for how to set up the server. In my last post, I explained how to set up a VPN server on a DD-WRT router. I will now explain how to access it, and use it as your internet connection.

On Windows it is quite simple. Perform these from a remote location. Here are step by step instructions for Windows 7:

1. Open Network and Sharing Center. This can be found by searching for it in the start menu.

2. Click “Set up a new connection or network”, and in the box that pops up, click “Connect to a Workplace”.

3. Click “Use my internet connection”, and for internet address, put the Internet IP address or hostname of your router. If you want a free hostname that you can remember, try DynDNS.

4. Click next, and for the username and password, put the username and password that is in the chap secrets on the router, leave Domain blank.

5. Click connect, the connection may fail, if it does follow these steps:

- In the Network and Sharing Center, click ‘Change adpater settings’.
- Right click on the VPN connection, and go to the “Networking” tab.
- Click on the IPv4 protocol, and click properties
- Click “Use the following IP address”, and set your IP address to the IP address that you set as the “Client IP”
- Set preferred DNS server to your router’s IP address (ex. 192.168.1.1)

Now it should work. And if you surf the web, all traffic will be going through the VPN.

For Ubuntu, it is a bit of a different process, and you must have installed the pptp-linux package:

1. Open a terminal window

To use this command, replace things like this: with the real thing. For example, if I say to type
pptpsetup -x [password]
And your password is foo, then type:
pptpsetup -x foo
I just wanted to be very clear on how to interpret my description of the command.

2. Anyway, type this:

sudo pptpsetup --create [anything here] --server [server name or IP] --username [your username] --password [your password] --start --encrypt


Use the username and password set in chap-secrets.

3. After that, you must route the internet through your new VPN server. Use this command:

sudo route del default gw [gateway IP address]

To find your gateway IP address, type “route” (no quotes) into the terminal, and look under “Gateway”.

Then, use this command:

sudo ip route add default via [Server IP address]

Your server IP address will be the one you set at the VPN setup page. Usually, it is 192.168.1.1

And that is the end of the VPN guide! Next post, I will show you how to use SSH to bypass a filter.

HOWTO: Use DD-WRT To Bypass Filters – Part 2-1: VPN – The server

This is part 2 of 3 in a series. This series is actually for an English class assignment, but I decided to put it on my main blog instead of my second blog (http://antani02.blogspot.com/).

==DISCLAIMER==

Use these methods at your own risk. If your workplace has an Acceptable Use Policy that forbids employees from bypassing the filter, then think before making the decision to do so.


VPN is one way to bypass a filter, it basically routes you to the internet through your home network, which is basically what SSH does. A notable difference is that with SSH, you don’t have access to the computers on your home network in the same way as VPN. With VPN, it puts you in the LAN that your router is in. You can use printers in the LAN, and even connect to them by local IP address (192.168.x.x). You can also access computers by IP address. This makes it more visible why VPN stands for Virtual Private Network.

With SSH, you are still going through the router, but aren’t placed in the LAN.

This post will focus on configuring VPN on a DD-WRT router. First though, I will explain some things to remember if you are considering installing DD-WRT.

First, check the DD-WRT database of compatible routers (Here). If you attempt to install it on an incompatible router, it may become permenantly bricked. If you don’t know, ‘bricked’ means a device that has been rendered completely useless (like a brick), usually as a result of messing around with the firmware. Also, read the installation instructions on the DD-WRT wiki (Here). I would also recommend reading and saving (Ctrl-S on most browsers) that page and any relevany pages, such as the Peacock Thread. Saving the pages is a good idea in case you screw up the router and cannot access the internet.

If you aren’t comfortable with installing DD-WRT, or otherwise just don’t want to, there are alternatives that don’t involve the router. You can install SSH servers on a computer at home, and use that instead. I won’t go into configuration of PC SSH servers, because that isn’t the focus of this tutorial.

So, now that you have DD-WRT installed and configured, you are ready to move on to the VPN server configuration. You can now access the web interface (Default IP address is 192.168.1.1) through your web browser. To do this, type 192.168.1.1 into your address bar.

Click to enlarge

You will see a page like this:

Click to enlarge
I have put 4 red dots on the ‘Services’ button. Click this button, and you may get a password prompt. If you have set a username and password, enter it. If not, the deafult DD-WRT username and password is:

User: root
Password: admin

After you type that in, you will be directed to another page. On this page, you may notice there is now a bar with a blue background under the other one. I have pointed it out in this image:


Click to enlarge

Click VPN in that bar. You will now see another page. Near the top, you will see PPTP server, and two radio buttons next to it (Enable and Disable). Radio buttons are the small circle buttons that you can click to activate. Click the Enable button, and then there will be more options. Set the next two radio buttons to ‘Enable’.

- For server IP, use 192.168.1.1, or whatever the IP address is (If you changed it).

- For client IP, put an IP address that starts with whatever the first 3 numbers of the Server IP is. For the fourth number, put any number up to 255. Remember the number you put here, as it will be used for client configuration.

- For chap secrets, put a username and password in this format:

username * password *

I used ‘root’ as the username, and it worked for me.

- Set the radius server radio button to “Disable”

Click “Apply Settings” at the bottom of the page, and the server’s configuration is finished!

Check out my next post for the VPN Client configuration (I have methods that you can use for both Windows and Ubuntu).

Older posts «